What if the most important number in your color workflow wasn't your bitrate, your frame rate, or
your export resolution? What if it was a number most editors have never even noticed — quietly
sitting in the title of every .cube file they have ever downloaded?
That number is the LUT grid size. And the difference between a 33-point LUT and a 65-point LUT is not cosmetic. It is a fundamental difference in how much of your footage's color information gets directly handled versus mathematically estimated — a distinction that shows up exactly where you least want it: in sky gradients, skin tones, and the smooth shadow rolls that make or break the look of professional footage.
This article covers the full story — what LUTs are, how the grid works, what separates the two formats, and why this distinction matters more than ever in 2026.
What Is a LUT — and What Is It Actually Doing to Your Footage?
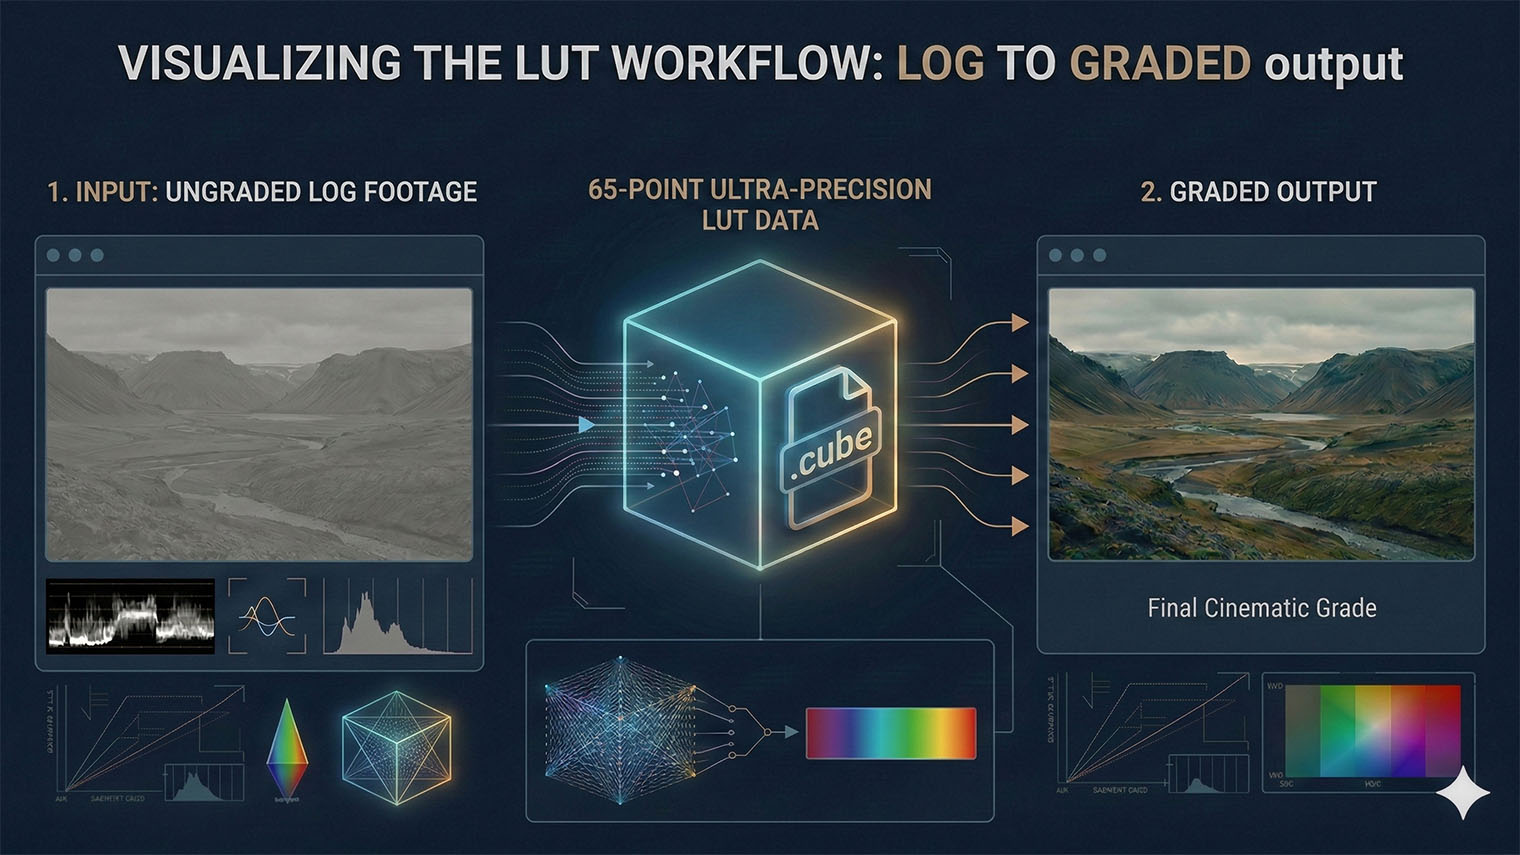
A LUT — Look-Up Table — is a pre-calculated color translation map. It takes the input RGB values of every pixel in your footage and remaps them to a new set of output values based on data stored inside the file. The result: an instant, repeatable color transformation applied at playback speed, without real-time math.
Think of it as a very precise color recipe bound into a single file. For each input color combination, the LUT has already worked out the answer. No rendering required. Just look it up — hence the name.
This speed and repeatability is why LUTs appear everywhere across modern video production:
- Log-to-display conversion — cameras like Sony, Canon, ARRI, and now Samsung and Apple record in flat, high-dynamic-range log profiles that look washed out straight from camera. A technical LUT converts them instantly into Rec.709, Rec.2020, or any target display standard.
- On-set monitoring — directors and DPs see the graded look on field monitors in real time while the camera continues recording in log, without touching the recorded file.
- Creative looks — emulating film stocks, maintaining a consistent visual style across a multi-camera project, or applying a signature cinematographic mood quickly and repeatably across any timeline.
- Display calibration — high-end reference monitors use 3D LUTs internally to compensate for hardware color deviations and hold broadcast-standard accuracy.
- Show LUTs — on larger productions, a colorist-authored LUT encodes the agreed visual identity of an entire series, so every episode starts from the same calibrated foundation.
There are two fundamental types of LUT. 1D LUTs operate along a single tonal
axis — they adjust brightness and apply per-channel gamma curves but cannot produce color
interactions between the red, green, and blue channels. They are fast, efficient, and ideal
for simple gamma transforms. 3D LUTs, by contrast, work inside a full
three-dimensional color space. They can shift hue, saturation, and luminance together —
enabling the kind of complex, cross-channel color transformations that define cinematic
grades. For creative color work, 3D LUTs are the essential standard. And they all share
a universal file format: the .cube file, a plain-text format readable by every
major NLE including Vegas Pro, DaVinci Resolve, Adobe Premiere Pro, and Final Cut Pro.
The color Look-Up Table wasn't invented in NLE software. It was pioneered in 1980s and 1990s digital film scanning systems used in Hollywood Digital Intermediate (DI) facilities. Scanning a film negative produced enormous, high-dynamic-range data that needed to be converted quickly and reliably into a stable, displayable signal for grading suites and output printers.
The LUT was the solution: pre-compute the required color transformation, store it in
a table, and apply it at real-time speed without recalculating the underlying math
for every pixel on every frame. The fundamental principle hasn't changed in forty
years. A .cube file applied to a smartphone-shot video in Vegas Pro
today is operating on the same core logic as those first film scanner lookup tables —
just running on hardware that would have been unimaginable to those early engineers.
How the Grid Works: Sampling, Interpolation, and the Color Cube
To understand why grid size matters, you first need a mental model of how a 3D LUT stores its data. Imagine the entire RGB color space as a physical cube. The Red axis runs left to right. Green runs bottom to top. Blue runs front to back. Every possible color in your footage is a unique point somewhere inside that cube.
To be perfectly accurate, a LUT would need a pre-defined output value for every single point inside that cube. For a 10-bit image, that means:
Instead of storing over one billion values, a 3D LUT places a regular grid of evenly spaced reference points throughout the color cube. Output values are defined only at those intersections. For any input color that falls between grid points — which is essentially every color in your actual footage — the software interpolates. It takes the nearest defined neighbors and mathematically estimates the correct output for that in-between point.
The grid size number — 17, 33, or 65 — describes how many equally spaced samples are placed along each axis of the cube. The total number of defined reference points follows from simple arithmetic:
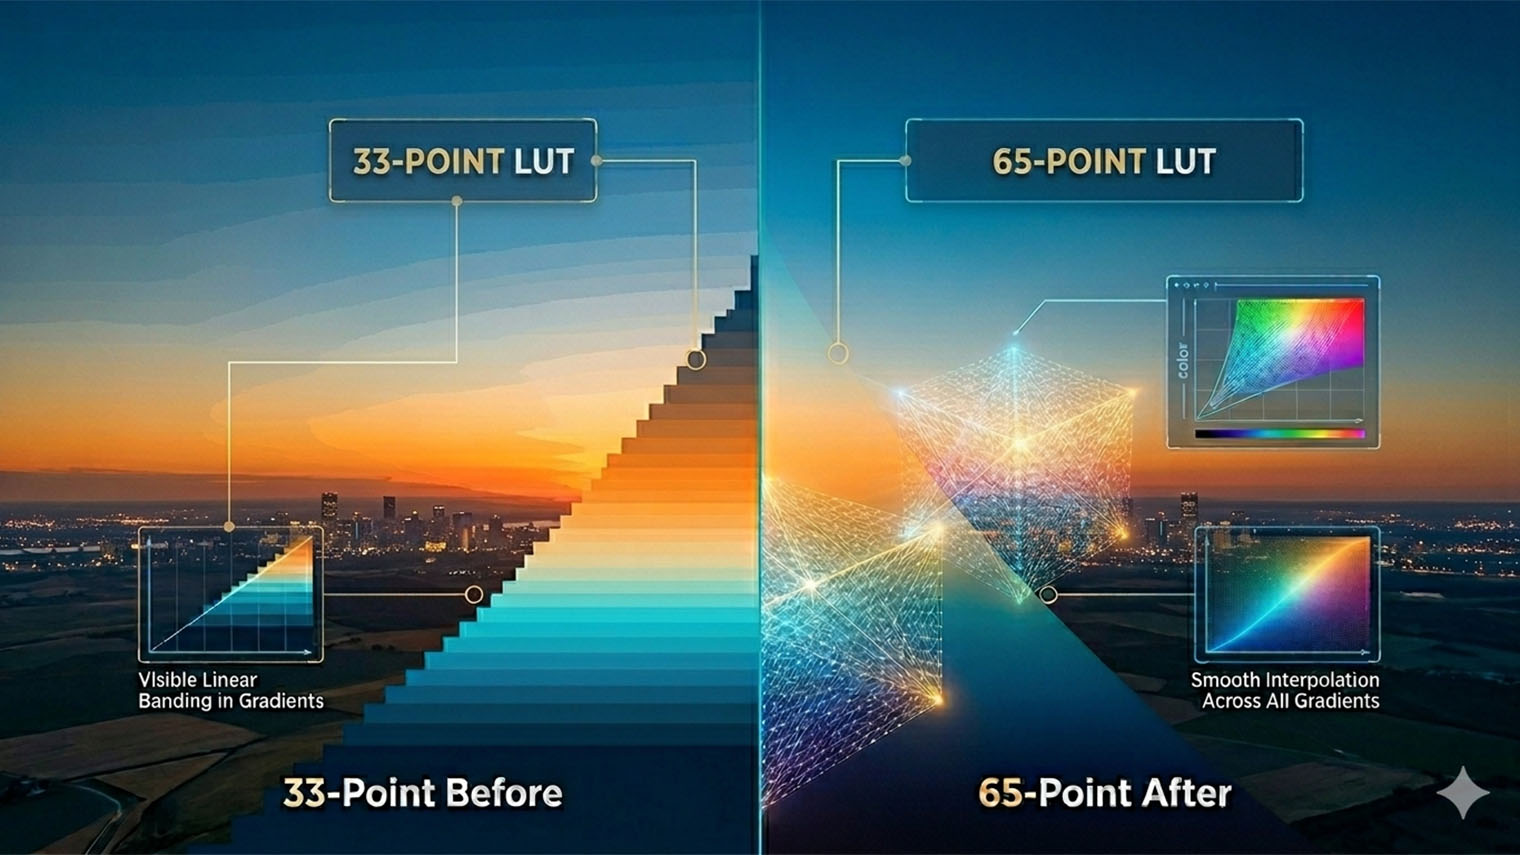
A 65-point LUT contains 7.65 times more defined reference points than a 33-point version. Fewer gaps between defined points means shorter interpolation distances. Shorter interpolation distances mean smaller estimation errors. Smaller errors mean more accurate color output — especially in smooth tonal gradients and the midtone region where the human visual system is most sensitive to mistakes.
Two Ways to Interpolate: Trilinear vs. Tetrahedral
The grid size alone doesn't tell the complete story. Two applications using the exact same LUT file can produce visibly different results depending on which interpolation method they use to estimate the colors between defined grid points.
- Trilinear interpolation — divides the space between grid points into simple linear segments. It is computationally lightweight, which is why it runs in real time on in-camera chips and portable field monitors. The downside: it is more likely to introduce subtle banding in complex gradients, particularly in the midtones.
- Tetrahedral interpolation — divides the same space into tetrahedral sub-units and performs more sophisticated blending. In controlled measurement tests, tetrahedral interpolation produces accuracy roughly equivalent to using a grid that is twice as large with trilinear interpolation — a significant quality difference from the exact same source file. Professional NLE software uses this approach.
⚠️ Banding appears at the limits of interpolation precision. If you have ever noticed faint color stripes in a blue sky, or a subtle stepped tone across a subject's forehead, you have seen a LUT's interpolation reaching the edge of its accuracy. This artifact is most visible with 33-point LUTs applied via trilinear interpolation — and it is most noticeable in HDR footage with wide color gamut source material, where the color cube is most densely populated with important data.
The 33-Point LUT: The Production Standard That Earned Its Place
The 33-point format didn't become the industry default by chance. With 35,937 defined color reference points and a compact file footprint, it provides a level of accuracy that covers the needs of the vast majority of video production workflows — particularly when applied via tetrahedral interpolation in a professional NLE. It is the format that camera manufacturers provide as their official log-conversion LUTs, and the format that virtually every device in the production ecosystem can read without compatibility issues.
Its compact size loads instantly, shares without friction, and performs in real time on hardware as constrained as a field monitor's embedded chip. For 8-bit footage and straightforward log-to-Rec.709 conversions, a well-made 33-point LUT with good tetrahedral interpolation will give you everything you need — and the vast majority of professional productions have relied on exactly this for years.
Strengths
- Universal — every camera, monitor, and NLE
- Compact file size — instant load and easy sharing
- Minimal processing demand on any hardware
- Camera manufacturers' standard format
- Ideal for on-set monitoring and in-camera preview
- Works well for 8-bit footage and simple grades
- Widely used for dailies and DIT workflows
Limitations
- Larger interpolation gaps between grid points
- Risk of banding in smooth gradients under heavy grades
- Stepping in HDR-to-SDR conversions in midtones
- Accuracy gap widens with extreme creative looks
- Less suited for 10-bit / 12-bit wide-gamut footage
- Trilinear path produces more visible artifacts
Where 33-point LUTs begin to show their limits is in complex transformations across a wide dynamic range — particularly in the midtones, where most of a camera's captured information lives and where the visual system is most sensitive to discrepancies. In 10-bit or 12-bit HDR footage with a heavy creative grade, the interpolation gaps can translate into subtle but visible artifacts: color stepping across foreheads, gentle banding in clear skies, and tonal inconsistency in smooth shadow rolls that signal to a viewer — consciously or not — that the image has been processed.
The 65-Point LUT: When Accuracy Is Non-Negotiable
The 65-point LUT addresses the interpolation gap directly. By placing 65 reference points along each axis of the color cube instead of 33, it generates 274,625 defined output values — 7.65 times more data than its 33-point counterpart. The interpolation engine has far less distance to travel between any input color and its nearest reference point. The math is forced to make smaller estimates, and smaller estimates produce more accurate output.
The improvement is most visible in exactly the areas that viewers notice instinctively, even without the technical vocabulary to describe what they are seeing:
- Sky gradients — the transition from cyan at the horizon to deep navy overhead is one of the most gradient-demanding scenes in any footage. A 65-point LUT renders it continuously, without the faint striping that signals digital processing to the human visual system.
- Skin tones — the most biologically scrutinized part of any image. Viewers have spent a lifetime reading human faces; they detect subtle hue irregularities in skin before they can consciously name them. A 65-point LUT maintains finer hue relationships through complex color transformations where a 33-point grid would introduce stepping.
- HDR-to-SDR conversions — among the most mathematically demanding LUT applications, requiring precise tonal compression across the full dynamic range. The denser grid handles these transitions with measurably fewer visible artifacts.
Strengths
- 7.65× more defined reference points than 33-point
- Near-seamless tonal gradients — minimal banding
- Superior skin tone accuracy in complex grades
- Optimal for 10-bit, 12-bit, and HDR source footage
- Best results with tetrahedral interpolation in NLEs
- Handles extreme creative looks with greater fidelity
- Professional standard for final deliverables
Limitations
- Larger file size than 33-point equivalent
- Higher GPU and memory demands
- Not supported by cameras or field monitors
- NLE / post-production software only
- Older workstations may notice a performance cost
The key hardware limitation is real and worth understanding: virtually every cinema camera,
mirrorless, and portable field monitor currently on the market supports only 17-point or
33-point LUT files. Attempting to load a 65-point .cube file directly onto
a Canon, Sony, ARRI, or Blackmagic camera will typically result in the file simply not
appearing in the device's LUT browser. The 65-point format is a post-production
tool, designed to be applied inside an NLE on a workstation with dedicated GPU
resources.
The two-LUT workflow: Many professional colorists maintain two versions of every grade LUT — a 33-point file for on-set monitoring, DIT use, and dailies distribution, and a 65-point file for the final NLE grade. Both encode the same creative intent. Only the 65-point delivers it with the maximum precision that post-production hardware can actually provide.
Seeing the Difference: A Simulated Visual Comparison
The panels below simulate the practical effect of LUT grid resolution on a warm sunset scene — one of the most demanding tests for any LUT because it combines fine cyan-to-blue transitions in the upper sky, complex warm-to-cool crossovers near the horizon, and wide luminance spans from deep shadow to bright highlight. These are precisely the tonal areas where interpolation accuracy matters most, and where artifacts are most detectable to the human eye.
33-Point vs. 65-Point: The Complete Head-to-Head
| Feature | 33-Point LUT (33×33×33) | 65-Point LUT (65×65×65) |
|---|---|---|
| Reference points | 35,937 | 274,625 7.65× |
| 10-bit color coverage | <0.003% directly defined | <0.026% — denser grid, less error |
| Color accuracy | Good — reliable for most work | Excellent — measurably more precise |
| Gradient smoothness | Good — banding risk under heavy grades | Superior — near-seamless transitions |
| Skin tone fidelity | Acceptable at moderate intensity | High — finer midrange resolution |
| File size & load time | Compact — very fast everywhere | Larger — fast on modern systems |
| Hardware support | Universal — cameras, monitors, NLEs | NLE only — not supported by cameras |
| Best interpolation | Trilinear (hardware) / Tetrahedral (NLE) | Tetrahedral — essential for full benefit |
| HDR & wide gamut | Adequate — midtone gaps may show | Recommended — handles complex ranges |
| Ideal workflow stage | On-set, in-camera, dailies, distribution | Final NLE grade, broadcast master, delivery |
Practical Guide: Which Format Belongs at Which Stage
The right LUT grid size is determined by where in the production workflow it is being applied — not by the complexity of the footage or personal preference. Here is the practical breakdown:
Use 33-Point When:
- Loading a LUT into a cinema camera or mirrorless for in-camera preview
- Driving a portable field monitor on set
- Creating dailies LUTs to distribute across mixed hardware
- Sharing with a DIT, client, or editor using varied devices
- Working with 8-bit footage and straightforward conversions
- Maximum cross-device compatibility is required
Use 65-Point When:
- Applying the final grade inside an NLE on a workstation
- Working with 10-bit, 12-bit, or HDR/HDR10 source footage
- Complex LUT transformation: HDR-to-SDR, camera log-to-display, strong creative look
- Delivering to broadcast, streaming, or cinema standards
- Archiving or sharing LUTs with other colorists for professional use
- Skin tones, sky gradients, or smooth shadows are prominent elements
For most of the history of desktop NLEs, the 65-point LUT was a theoretically superior option with a practical problem: the larger grid demanded more computational work per frame, and on systems without dedicated GPU color processing, applying a 65-point LUT in real time came with a noticeable performance penalty. Editors chose the 33-point format not because it was more accurate, but because it was the one their hardware could run without dropping frames.
The rewritten VEGAS Core Engine in Vegas Pro 23 changes this completely. By introducing a DirectX-based GPU color-processing pipeline that keeps frames in GPU memory across grading and effects stages — eliminating the redundant CPU-to-GPU memory transfers of earlier architectures — the engine achieves a documented jump from approximately 45 frames per second in Vegas Pro 22 to approximately 184 frames per second in Vegas Pro 23 in typical color grading workflows. That is roughly a 4× performance improvement. On that kind of hardware, the additional computational load of a 65-point LUT is simply absorbed by the available GPU resources, making the accuracy upgrade free in practical terms.
65-Point LUT Export Is Now Built Into Vegas Pro
Vegas Pro 23, released on September 9, 2025, quietly delivered one of the most significant quality upgrades in its color workflow history: native 65-point LUT export directly from the Color Grading Panel. This is not a plugin or an add-on — it is built into the core software, accessible to every Vegas Pro 23 user. The workflow is as direct as it gets: finish your grade in the Color Grading Panel, then access the export option through the three-dot menu in the top-right corner of the panel and select Export LUT. Vegas Pro 23 will write your grade as a professional 65-point .cube file — ready to be applied across other clips, shared with your team, or loaded into other software for a consistent look.
Vegas Pro 23 also introduced native camera LUT profiles for Samsung Log and Apple Log — meaning footage from modern smartphones can now be accurately converted in the same high-precision 65-point workflow. Combined with ACES 1.3 support and a Core Engine rewrite that dramatically increased color grading performance, version 23 represents a meaningful leap forward for editors who take color seriously.
The Takeaway
The 33-point LUT is not an outdated tool. It remains the correct choice for on-set monitoring, in-camera preview, dailies pipelines, and any workflow where hardware compatibility must come first. It has earned its place in professional production and will continue to hold it.
But when you are inside an NLE, working with high-bit-depth footage, applying a final grade that needs to survive the scrutiny of broadcast or streaming delivery — the 65-point format is the defensible professional choice. More reference points, shorter interpolation distances, smaller estimation errors, and results that align more closely with your grading intent rather than drifting slightly away from it in the places that matter most.
Understanding the difference is what separates editors who use LUTs from editors who understand them. And with Vegas Pro 23 making 65-point LUT export accessible to every editor regardless of budget, that precision is no longer a privilege of high-end facilities. It is a feature you can enable in four clicks.
Put this knowledge to work today: Browse our professionally crafted
LUT presets and color packs — built for Vegas Pro
and fully compatible with the 65-point workflow in Vegas Pro 23. Every preset ships
as a standard .cube file ready for use at any stage of your pipeline.
Or explore our Vegas Pro templates —
fully graded project files, export-ready and built for the platform.