Film Grain — Photochemical Film Grain OFX Plugin for Vegas Pro & DaVinci Resolve
The most authentic film grain plugin for Vegas Pro and DaVinci Resolve. 66 real film stock profiles, proprietary 3D noise engine, film softness & breath — all in a single OFX plugin with OpenCL GPU acceleration.
One-time purchase · Lifetime updates · Vegas Pro 15–2026 · DaVinci Resolve 17–21 Studio
66 Film Stocks
Kodak, Fuji, Ilford, Cinestill, Polaroid, Lomography and more
Proprietary 3D Noise
Custom grain synthesis - no patterns, no repeating tiles, no looping artifacts
Resolution-Independent
Same perceptual grain at SD, 1080p, 4K, 6K & 8K - no manual adjustments needed
Full Film Pipeline
Grain + Film Softness + Gate Weave + Film Breath
Authentic Film Grain. In Your Timeline.
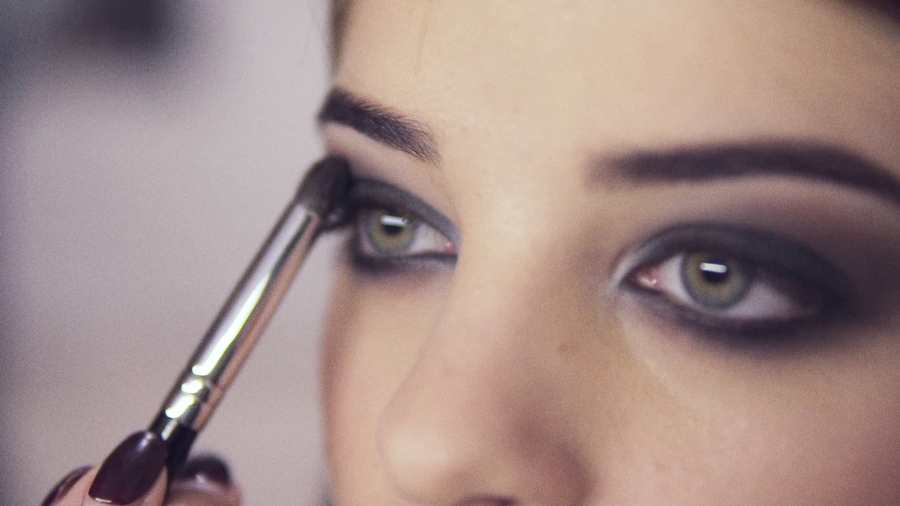
Film grain is a texture — textures are best evaluated in still images. The screenshots and before & after comparisons below show the exact pixel-level grain output at full quality. Scroll down to compare presets, examine grain structure, and see the complete film pipeline in action.


Before & after comparison "Kodak T-Max 3200"
Real Film Grain Shouldn't Be This Hard to Get
Adding convincing photochemical grain to digital footage has always been frustrating — whether you edit in Vegas Pro or grade in DaVinci Resolve. The alternatives are either overpriced, locked to subscriptions, or produce unconvincing results:
- Professional suite grain tools — bundled into large VFX packages costing $1,000+. You pay for hundreds of effects just to get the one you need.
- Subscription-based film emulators — recurring cost of $99+/year, heavy CPU/GPU load, limited color space support. Subscription emulators cost more per year than Film Grain costs once.
- Camera-profile-dependent plugins — grain character is tied to your specific camera model. No matching profile means no authentic result. Requires purchasing separate camera packs and locks you into a camera-first workflow rather than a film stock–first one.
- Static grain overlays — the grain isn't connected to your image at all. A pre-recorded loop is composited on top, blind to the content underneath: no luminance response, no per-channel variation, and it will always look pasted on — because it is.
Film Grain fills this gap. A dedicated, affordable OFX plugin built from scratch for editors and colorists who want authentic photochemical grain without the enterprise price tag — in Vegas Pro or DaVinci Resolve.
Built for Editors and Colorists Who Care About the Image
- Indie filmmakers and narrative editors — add a period-accurate or stylized film stock character to digital footage directly in your editing or grading host. Kodak Vision3, Fuji Eterna, Super 8 Kodachrome — pick the emulsion that fits the story.
- Music video editors — film grain is a creative tool, not just a realism aid. Heavy Ilford HP5, Lomography, or Expired Film presets give music cuts a distinctive visual texture that stands apart from clean digital.
- Documentary and interview editors — a subtle Kodak Portra 400 or Vision3 250D preset softens the clinical sharpness of modern cameras and gives archival-style footage a cohesive, organic feel.
- Colorists in DaVinci Resolve — apply Film Grain as an OFX node directly in the Color page. Works natively in Resolve 17, 18, 19, 20 and 21 Studio. Add it before or after your LUT node — all 32 parameters are keyframeable via Resolve’s keyframe editor.
- Colorists finishing in Vegas Pro — apply Film Grain as the last step in the FX chain (or first, before a LUT) to integrate grain into the grade rather than sitting on top of it. All 32 parameters are keyframeable.
- Content creators and YouTubers — the resolution-independent engine means a single preset works identically at 1080p, 4K, or 6K. No reformatting, no manual size corrections between delivery formats.
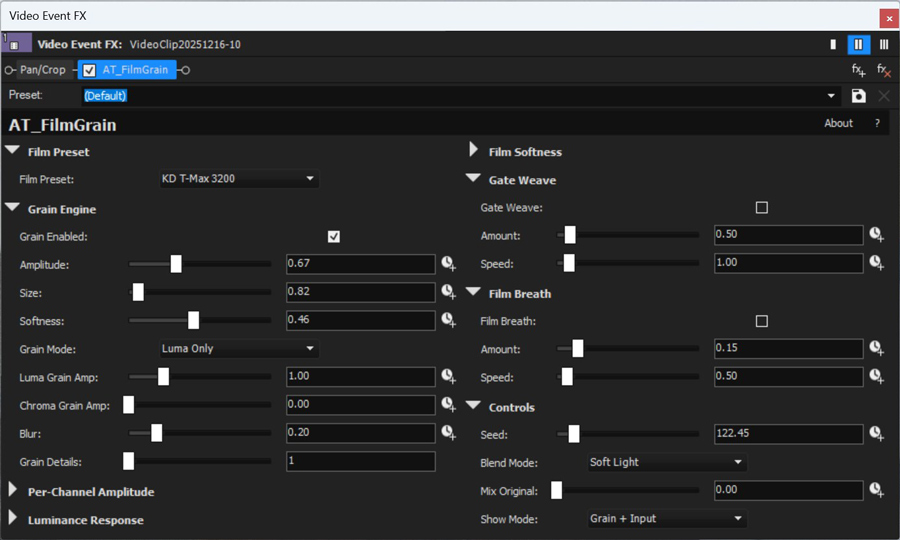
Professional Controls, Organized by Workflow
All parameters are grouped logically in the plugin panel. Select a film stock, fine-tune grain character, enable post-processing effects, and preview in real time — all from a single OFX plugin. Works identically in Vegas Pro and DaVinci Resolve.


Before & after comparison "Kodak Portra 800"
What Makes Film Grain Different
Every component is purpose-built for photochemical accuracy - not a repurposed noise generator with a film label on it.
Proprietary 3D Noise Engine
Mathematically correct procedural grain that never tiles, never patterns, and never repeats. Seed-driven, deterministic, and fully thread-safe.
66 Real Film Stock Profiles
Each profile calibrated with unique grain amplitude, size, softness, per-channel response, luminance zones, grain detail layers, and post-processing settings. Works identically at any resolution — SD, 1080p, 4K, 6K, 8K.
3-Zone Luminance Response
Independent grain intensity for shadows, midtones, and highlights with organic density roll-off and adjustable gate threshold - accurately recreating the response of real silver halide emulsion.
Film Softness
Simulates the inherent softness of photochemical emulsion - separate luma and chroma blur that gently reduces digital sharpness while preserving the grain structure.
Resolution-Independent Grain
Grain size auto-scales to the render resolution — Size 1.0 produces the same perceptual grain at 1080p, 4K, 6K, and 8K. No manual compensation needed when switching delivery formats.
Gate Weave & Film Breath
Mechanical gate jitter and focus oscillation simulating a real film projector. Adjustable amplitude and speed; auto-compensating zoom prevents black border artifacts at any frame size.
Grain Texture Layering
Multiple detail layers blended to produce grain character from ultra-fine (65mm IMAX) to coarse, chunky emulsion clumps (expired instant film). Per-channel luma/chroma separation.
From Kodak Vision3 to Polaroid Expired
Every profile is individually calibrated - grain size, amplitude, softness, luminance zones, texture layering, and post-processing are all tuned to match the real emulsion character.
Film stock names (Kodak, Fuji, Ilford, Agfa, CineStill, Lomography, Rollei, Konica, ORWO, Polaroid, ARRI, RED, Technicolor) are trademarks of their respective owners and are used for identification purposes only. Film Grain is not affiliated with or endorsed by any of these companies.
Every film grain plugin claims "realistic grain" - but Film Grain is the only one built with per-profile softness, luminance zones, and layered micro-detail baked into each of the 66 stocks. It's a complete film pipeline, not a noise overlay with a new label.
From Subtle 65mm to Gritty 8mm
Film Grain scales from nearly invisible fine-grain (65mm IMAX stocks) to heavy, textured emulsion character (expired instant film). Every profile maintains correct luminance response — more grain in shadows, less in highlights, just like real film.
The physics behind this range is straightforward: the smaller the physical film frame, the larger each silver crystal appears relative to the final projected image. A Super 8 frame is roughly 30× smaller than a 65mm IMAX frame — so the same grain structure occupies proportionally more of the picture. Film Grain’s profile library spans this full range, from Vision3 50D shot on 65mm-equivalent stock to Super 8 Kodachrome 40.


Kodak Vision3 500T


Fuji Superia 400


Ilford HP5 Plus 400


Polaroid SX-70
4 Steps to Authentic Film Look
From clean digital to photochemical film — in Vegas Pro or DaVinci Resolve.
Apply the Plugin
Add "AT_FilmGrain" from AlesTempleFX via Video Event FX (Vegas Pro) or the OpenFX panel on the Color page (DaVinci Resolve)
Pick a Film Stock
Choose from 66 profiles: Portra, Vision3, Velvia, HP5 - or start Custom. Grain auto-scales to your project resolution
Fine-Tune
Adjust grain intensity, size, luminance zones, film softness, blend mode, and gate weave to taste
Render
Preview in real-time with GPU acceleration, then render your final output
How Does It Compare?
Film Grain delivers capabilities that typically require $200–$1,650 plugin suites — at a fraction of the price, natively in Vegas Pro and DaVinci Resolve.
| Feature | Film Grain | VFX Suite Plugin | Subscription Emulator | Camera Profile Plugin |
|---|---|---|---|---|
| Works in Vegas Pro | ✔ Native OFX | ✔ OFX (suite) | ✔ OFX | ✘ No |
| Works in DaVinci Resolve | ✔ Native OFX | ✘ No | ✔ OFX (Resolve native) | ✘ No |
| Film Stock Profiles | ✔ 66 stocks | ● 80+ (not film-specific) | ✔ 60+ | ✔ 19 |
| Procedural 3D Noise Engine | ✔ Algorithmic 3D Grain Synthesis | ● 2D procedural | ✔ Emulsion model | ✘ Overlay-based |
| Luminance Zone Control | ✔ 3-zone + gate | ✔ 3-zone | ● Response curve | ● Basic |
| Per-Channel Luma/Chroma | ✔ Full control | ✔ R/G/B | ✘ No | ✘ No |
| Film Softness | ✔ Luma/Chroma | ✘ No | ✘ No | ● Diffusion |
| Gate Weave | ✔ Built-in | ✘ No | ✘ Separate ($99) | ✘ No |
| Film Breath | ✔ Built-in | ✘ No | ✘ Separate ($99) | ✘ No |
| GPU Acceleration | ✔ OpenCL | ✔ CUDA/Metal | ✔ GPU | ✘ CPU only |
| Grain Details | ✔ 1–3 Layers of Micro-Detail | ✘ No | ✘ No | ✘ No |
| Resolution-Adaptive Grain | ✔ Auto-scales SD→8K | ✘ Manual | ✘ Manual | ✘ Manual |
| Pricing Model | ✔ One-time purchase | ● One-time (suite) | ✘ $99+/year subscription | ● One-time |
| Price | $69.95 | $1,650 (suite) | $99–$449 | $159 |
Built for Authenticity, Not Convenience
Here's what most grain tools get wrong: they add noise on top of an image. But on real film, the image is grain — every detail, every shadow, every highlight exists only as a structure of silver halide crystals. There is no “image underneath” with grain placed on it.
Film Grain is built on this principle. The engine generates grain from the local luminance and color of each pixel, then constructs the image through it — not over it. The result is grain that’s physically integrated into the picture, the same way photochemical emulsion is:
- Organic, Non-Repeating Grain - every frame receives unique, structurally authentic grain with no tiling artifacts, no static textures, and no visible repetition at any resolution
- Resolution-Independent Scaling - grain size auto-normalises to a 1920px baseline; Size 1.0 produces identical perceptual grain at 1080p, 4K, 6K, and 8K without any manual adjustment when switching delivery formats
- Frame-Consistent Rendering - grain is deterministic per frame and renders identically regardless of playback or render order, eliminating shifting artifacts common in NLE out-of-order rendering
- Dynamic Luminance Response - grain intensity varies naturally across shadows, midtones, and highlights with adjustable thresholds and smooth tonal roll-offs, perfectly mimicking actual film density limits
- 4 Advanced Blend Modes - Add, Screen, Overlay, and Soft Light provide precise control over how the grain physically interacts with the underlying image exposure
- Luma/Chroma Decomposition - independent grain amplitude controls for luminance and chrominance channels, accurately matching how real film stock reacts differently to brightness versus color information
- Negative and Positive Emulsion Character - color reversal stocks like Fuji Velvia and Provia carry calibrated lower grain in highlights, while color negative stocks like Kodak Portra 800 and Vision3 500T carry proportionally more — matching the physics of negative density accumulation. This distinction isn’t a global toggle: every one of the 66 profiles encodes the exact highlight-to-shadow grain ratio of that specific emulsion type
Why does this matter? A proper noise engine means grain that behaves correctly at every exposure level, every color, every frame - with zero visible tiling or repetition, even at 4K resolution with slow pans.
The Complete Film Grain Pipeline
- ✓66 calibrated film stock profiles
- ✓Proprietary 3D noise engine — no tiling, no loops
- ✓Film Softness · Gate Weave · Film Breath
- ✓GPU accelerated (OpenCL) + CPU fallback
- ✓Resolution-independent: 1080p → 8K without changes
- ✓One-time purchase — no subscription, no renewals
- ✓Lifetime updates included
14-day refund policy · Secure payment via PayPal · Lifetime updates included
Under the Hood
Install in Under 60 Seconds
No installer required. Just extract the archive and copy one folder.
-
Download the plugin archive (.zip) after purchase and extract
it. Inside you will find the folder
AT_FilmGrain.ofx.bundle. -
Copy the entire folder
AT_FilmGrain.ofx.bundleinto the OFX Plugins directory:
C:\Program Files\Common Files\OFX\Plugins\
You will need administrator permissions to write to Program Files. -
Verify the final path looks like this:
C:\Program Files\Common Files\OFX\Plugins\AT_FilmGrain.ofx.bundle\Contents\Win64\AT_FilmGrain.ofx - Restart your OFX host (Vegas Pro, DaVinci Resolve, or other). The plugin loads at startup.
-
Vegas Pro: Select a video event, click the Video Event FX
button, search for “AT_FilmGrain” in the AlesTempleFX category.
DaVinci Resolve: Go to the Color page, open the OpenFX panel (top right), find AlesTempleFX → AT_FilmGrain and drag it onto a node.
Tip: If the plugin does not appear, make sure you copied the entire
AT_FilmGrain.ofx.bundle folder (not just the .ofx file). The required structure
is:
AT_FilmGrain.ofx.bundle\Contents\Win64\AT_FilmGrain.ofx
The Science Behind Film Grain
Interesting fact: Real film grain isn't noise - it's the physical structure of randomly distributed silver halide crystals developed into metallic silver particles. In color negative film like Kodak Portra, grain is actually dye clouds formed around these crystals in three separate emulsion layers (cyan, magenta, yellow), each with different crystal sizes. That's why the blue-sensitive layer always shows the most grain - its crystals are the largest. Film Grain replicates this by applying individual per-channel amplitude ratios (R/G/B) calibrated from real spectral sensitivity data for each of the 66 film stocks.
T-grain vs classical grain: Kodak T-Max and Ilford Delta films use a different crystal geometry entirely. Where conventional silver halide forms irregular, roughly rounded clumps, T-grain (tabular grain) consists of flat, plate-shaped crystals lying nearly parallel to the emulsion surface. This gives T-grain stocks their characteristic fine, sharp texture — noticeably different from the chunky, organic character of Tri-X or HP5. Film Grain models this distinction for every T-grain profile through individually tuned softness and blur parameters, producing a tighter grain structure that matches the visual signature of these films.
Pro Tips for Getting the Best Results
- Start with a preset, then fine-tune. Select the closest film stock profile, then adjust Grain Amplitude and Size to match your footage resolution and creative intent. The preset gives you the correct spectral ratios and luminance response - you just dial in the overall intensity.
- Use Soft Light blend mode for realism. All 66 presets default to Soft Light, which integrates grain into the image's existing tonal structure rather than sitting on top. Switch to Add or Screen only for stylized effects.
- Grain before color grading. For the most natural result, apply Film Grain before any color correction or LUT in your FX chain (Vegas Pro) or node graph (DaVinci Resolve). Real film grain is part of the emulsion - it gets graded along with the image, not added on top of the final look.
- Match grain amplitude to your delivery format. Grain size is already resolution-independent — no manual adjustment needed when switching from 1080p to 4K. For web/streaming (high compression), increase Grain Amplitude slightly (+0.1–0.2 above the preset default) to compensate for H.264/H.265 codec smoothing of fine texture. For ProRes or uncompressed masters, use preset values as-is.
- Film grain lifts the black point — compensate if needed. Real photographic emulsion always carries some grain density even in the deepest shadows: absolute black doesn’t exist on film. Film Grain replicates this correctly. If your grade relies on a precise black level, add a Levels or Curves correction after Film Grain and nudge blacks down by 2–5%. The result is a more accurate film look — shadows that are dark, but never empty.
- Use the Show Mode parameter for debugging. Toggle Show Mode to isolate grain on a neutral grey background - you'll see exactly what the plugin is adding without the distraction of your footage.
Where Does Film Grain Belong in Your Pipeline?
Position matters. Grain applied before your grade behaves like real emulsion. Grain applied after feels like a layer on top.
The physical principle: Silver halide grain forms during film exposure and chemical development — it is structurally part of the image, not a surface coating. When a colorist grades a real film negative, they grade the grain along with every shadow and highlight. To replicate this behaviour, Film Grain must be placed before your creative color work, not after it.
Grain added after a LUT or color grade is compressed or clipped by that grade’s contrast curve, which can cause it to sit visibly on top of the image rather than inside it.
Vegas Pro — FX Chain
- Source clip
- Exposure / Levels correction
- ▶ AT_FilmGrain here
- Color grade / LUT
- Output sharpening (optional)
DaVinci Resolve — Node Graph
- Input node (log decode / CST)
- Exposure / balance node
- ▶ AT_FilmGrain node here
- Creative grade / LUT node
- Output node (delivery colorspace)
Exceptions & Creative Variations
- Print stock emulation. To simulate the look of a film print (grain on both negative and print), apply two instances of Film Grain: one before the grade (negative grain — larger, chunkier) and one after (print grain — smaller, tighter). Lower the amplitude on both compared to a single-instance setup.
- Lo-fi and damaged film looks. For heavily stylised results — cross process, expired stock, Lomo — placing Film Grain after a strong creative LUT can produce interesting compression artifacts where grain interacts with pushed colour. Use Screen or Add blend modes in this case rather than Soft Light.
- Grain intensity and delivery codec. H.264/H.265 encoders actively suppress fine texture during compression. If your final delivery is a streaming encode rather than ProRes or an uncompressed master, raise Grain Amplitude by 0.1–0.2 above the preset default to compensate for codec smoothing.
Frequently Asked Questions
Yes — grain size is automatically normalised to a 1920px baseline. Size 1.0 produces identical perceptual grain whether your project is 720p, 1080p, 4K, 6K, or 8K. You never need to manually compensate the Size parameter when changing delivery resolution.
Film Grain works with Vegas Pro 15 and all later versions, including Vegas Pro 22 and 2026. For DaVinci Resolve, it has been tested and confirmed working in DaVinci Resolve Studio 17, 18, 19, 20, and 21. It is a standard OFX 1.4 plugin and should also work in any other OFX-compatible host.
Grain overlays are pre-recorded loops that tile and repeat. Film Grain uses a proprietary 3D noise engine that generates mathematically unique grain for every pixel, every frame. The grain responds to luminance zones (more in shadows, less in highlights), varies per channel, and includes film softness, gate weave, and film breath — things no overlay can do.
Scanned grain overlays are pre-recorded footage of real film — they look
authentic in isolation, but they’re not connected to your image in any way. The same
loop plays regardless of what’s in the frame, what the exposure is, or what resolution
you’re working at. On a bright sky, a dark face, a fast cut — the overlay
doesn’t know and doesn’t care.
Procedural grain is generated from the
content of each frame. Shadows get more grain, highlights less — exactly as real
silver halide emulsion behaves. Grain size auto-scales to your project resolution. Every
frame is unique. The grain responds to the image rather than sitting on top of it.
That’s the physical difference between a composited texture and an emulsion model.
Film Grain uses OpenCL for GPU acceleration, which is supported by most modern GPUs from NVIDIA, AMD, and Intel. If no compatible GPU is detected, the plugin automatically falls back to a high-performance multi-threaded CPU renderer - no manual configuration needed.
Yes. Select "Custom" from the preset menu and adjust all 32 parameters manually - grain amplitude, size, softness, luminance zones, octave count, per-channel response, film softness, gate weave, and film breath.
Film Grain uses a proprietary 3D noise engine that generates structurally unique grain for every pixel and every frame. Unlike common approaches that rely on pre-baked textures or predictable algorithms, the engine produces organic, isotropic grain with no visible repetition - even at 4K with slow camera pans.
Yes, perfectly. Even on a still image or a single-frame graphic, the grain remains fully dynamic and animated, just like on a video clip. The engine generates a unique noise pattern for every frame of your timeline.
All parameters are keyframeable in both Vegas Pro and DaVinci Resolve. In Vegas Pro, use the standard envelope system. In DaVinci Resolve, use the built-in Keyframes panel on the Color page. Animate grain intensity, blend mode, gate weave, film breath — everything. Create builds, transitions, and precisely timed grain hits.
There is no free trial. However, we offer a 14-day refund window if the plugin is defective, doesn't work as described, or a technical issue prevents you from using it. Email info@alestemple.net within 14 days of purchase with your order details and a description of the issue. Full terms at alestemple.net/refund-policy.html.
The license is per-user. You can install it on all the machines you personally use for editing.
Your Footage Deserves Film Character.
66 film stocks, proprietary 3D noise engine, film softness, gate weave, film breath — the complete film grain pipeline for Vegas Pro editors and DaVinci Resolve colorists. Resolution-independent: identical grain at 1080p, 4K, 6K and 8K.
Buy Now — $69.95One-time payment · Lifetime updates
Stay Updated
Subscribe to our newsletter for new plugins and updates